| Top page for “Why is the measured tip temperature lower than the set temperature?” | |
| Check 1 | Are the tip, element cover, nut, etc. oxidized? |
| Check 2 | Is the tip shape changed? |
| Check 3 | Has the sensor of the thermometer deteriorated? (In the case of HAKKO-manufactured contact-type measuring instruments) |
| Check 4 | Are the batteries low on power? |
| Check 5 | Is the correct measurement method suitable for the measuring instrument being performed? |
Check 5. Is the correct measurement method suitable for the measuring instrument being performed?
If the wrong method is performed for measurements, the correct temperature is not obtained in some cases.
Measure the temperature with the correct method suitable for the measuring instrument again. If the temperature is still shown lower, confirm the details in Checks 1 through 4.
Correctly measuring the tip temperature
We HAKKO recommend that the same tip undergoes measurement several times and the measured maximum temperature is adopted as a correct tip temperature. Since the temperature may be displayed lower for I-type and 1C-type tips whose tip end is thin in particular, take sufficient time for measurement and read the temperature when the displayed data are stable.
note: If a measuring instrument manufactured by another company is used, refer to its instruction manual.
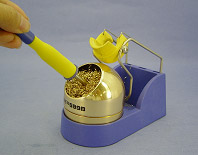 | 1. Remove solder stuck on the tip before measurement. | ||||||
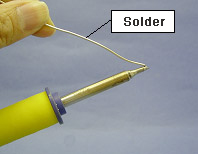 | 2. Apply new solder in the tip. | ||||||
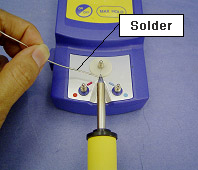 | 3. Place the tip on the measuring point and apply solder to it. * Photo of the FG-100 discontined. * NOTE The sensor also becomes deteriorated gradually as the number of measuring times increases, causing the correct temperature not to be obtained. Refer to Check 3.
| ||||||
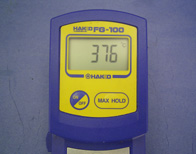 |
4. Read the displayed values. (The photo shows 376ºC.) * Photo of the FG-100 discontined. 5. Repeat the items 1 through 4. Check the maximum temperature. |
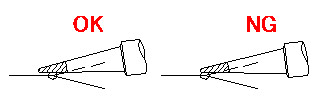
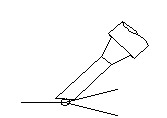
| Points for measurement Placing the tip on the measuring point horizontally enables the correct temperature measurement.
CAUTION: It is impossible to measure while applying hot air of Hot Air Rework System (HAKKO FR-801, etc.) directly. Use the Temperature Probe (No. C1541) specifically for Hot Air Rework Systems. * Photo of the FG-100 discontined. Replacement parts for Temperature Probe for Hot Air Rework System(No. C1541) 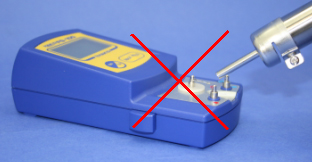 If many soldering irons are measured every day by several persons, since it is likely to generate differences among individuals, it is recommended that measurements be taken by the same person under the same conditions. |